
Introduction
ghostidp is a mock Identity Provider to support development.
Concept
ghostidp is born from a development need to have hard-coded users in an OpenID Compliant Identity Provider.
The goal was to have an easy to setup/configure development Identity Provider preloaded with demo users having different claims. This allows, for instance, to simulate different roles or different identity providers.
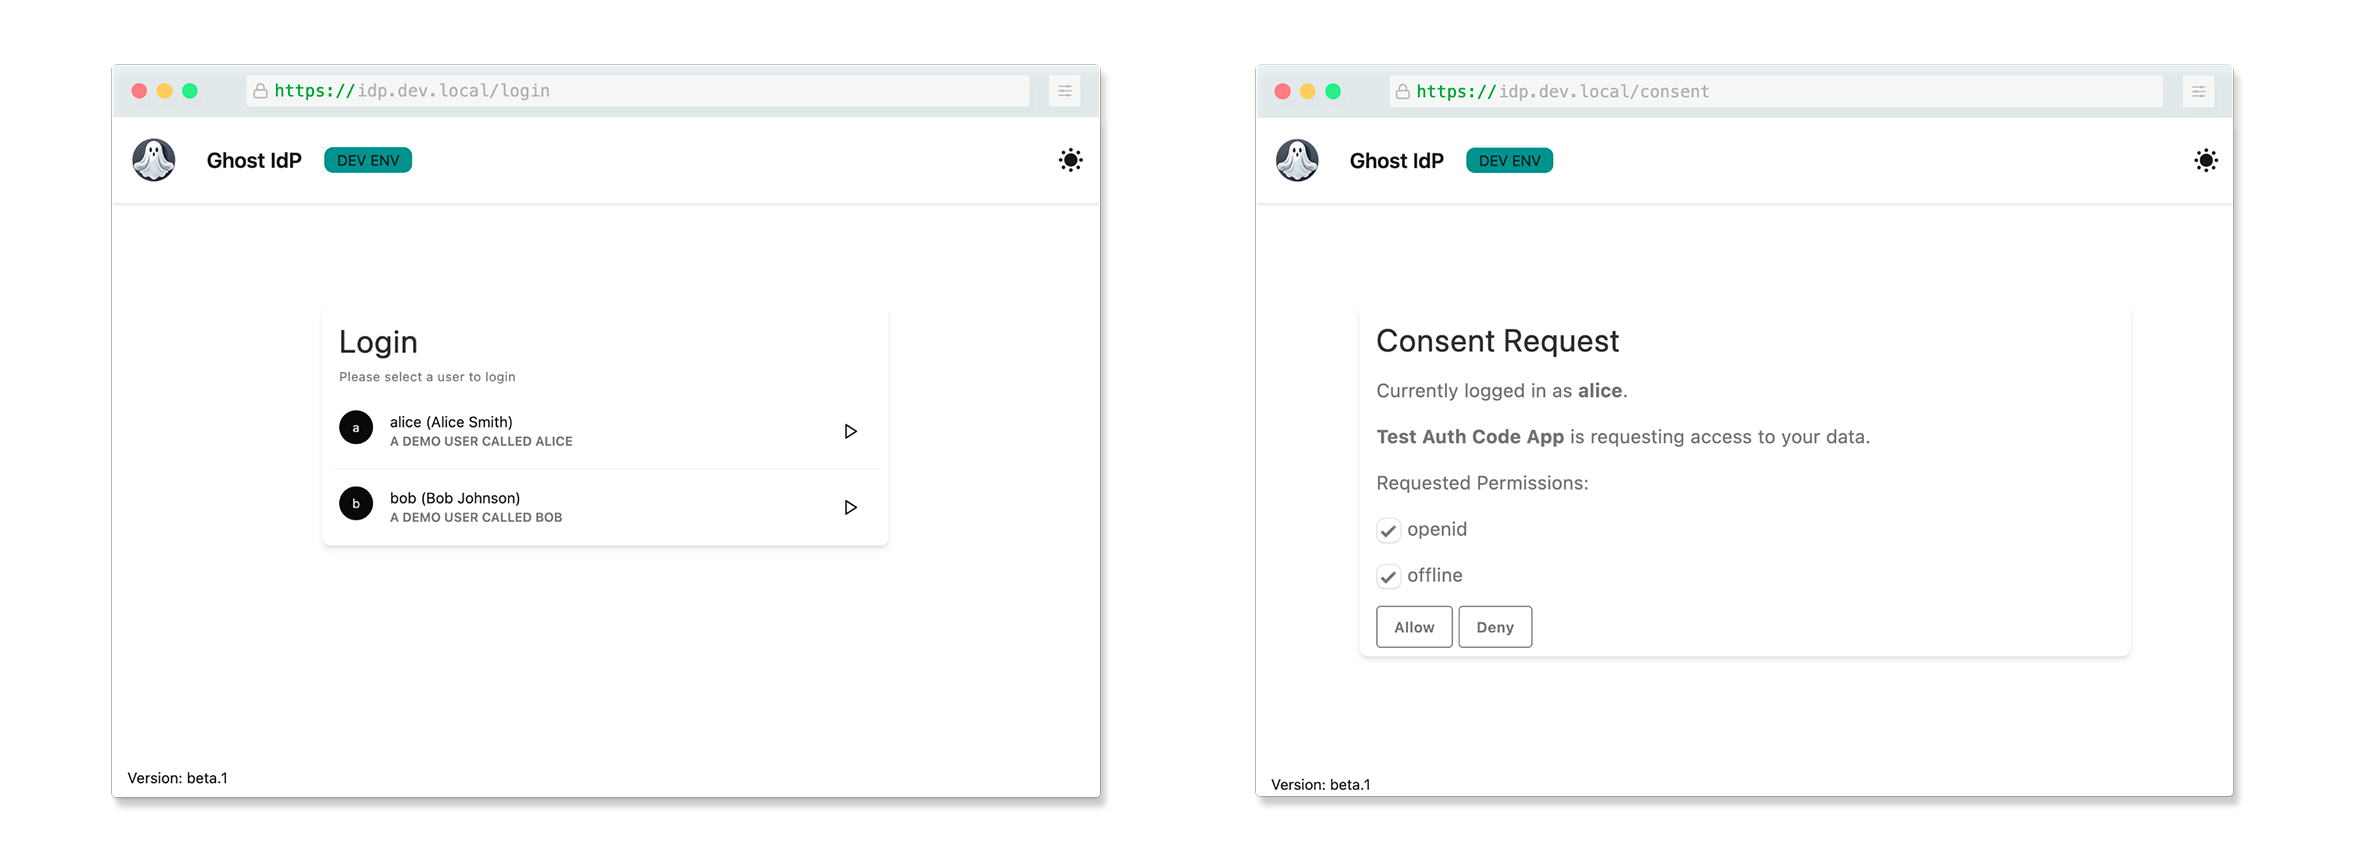
In practice, ghostidp is a custom UI implementation of the login and consent screens of Ory Hydra.
Users have no password and can simply be selected out of a list of all available users. This, in addition to the absence of session, makes for an easy way to switch from one user to another.
At the moment, ghostidp focuses on scenarios where the obtained JWT token is only used for authenticating the user in the application.
warning
It should be obvious from the above text, ghostidp is meant for development only, and should not be used in a production environment.
Contributing
ghostidp is free and open source. You can find the source code on GitHub and issues and feature requests can be posted on the GitHub issue tracker.
License
ghostidp source and documentation are released under the MIT License.
Concept
ghostidp is built on top of Ory Hydra as an implementation of the "Ory OAuth 2.0 login & consent flow."
Ory Hydra is an OpenID Certified OAuth 2.0 Server and OpenID Connect Provider, and as such, it doesn't contain a database with end users. Instead, it delegates the login and consent flow to a dedicated application (in our case, ghostidp).
The full explanation of how this works from Hydra's perspective is available in Hydra's documentation: User login and consent flow.
Sequence Diagram
Here is a sequence Diagram of what happens, adapted from the Ory Hydra Documentation:
sequenceDiagram
    OAuth2 client->>Ory OAuth2 and OpenID Connect: Initiates OAuth2 Authorize Code or Implicit Flow
    Ory OAuth2 and OpenID Connect-->>Ory OAuth2 and OpenID Connect: No end user session available (not authenticated)
    Ory OAuth2 and OpenID Connect->>Login Endpoint (ghostidp): Redirects end user with login challenge
    Login Endpoint (ghostidp)-->Ory OAuth2 and OpenID Connect: Fetches login info
    Login Endpoint (ghostidp)-->>Login Endpoint (ghostidp): Authenticates selected user
    Login Endpoint (ghostidp)-->Ory OAuth2 and OpenID Connect: Transmits login info and receives redirect url with login verifier
    Login Endpoint (ghostidp)->>Ory OAuth2 and OpenID Connect: Redirects end user to redirect url with login verifier
    Ory OAuth2 and OpenID Connect-->>Ory OAuth2 and OpenID Connect: First time that client asks user for permissions
    Ory OAuth2 and OpenID Connect->>Consent Endpoint (ghostidp): Redirects end user with consent challenge
    Consent Endpoint (ghostidp)-->Ory OAuth2 and OpenID Connect: Fetches consent info (which user, what app, what scopes)
    Consent Endpoint (ghostidp)-->>Consent Endpoint (ghostidp): Asks for end user's permission to grant application access
    Consent Endpoint (ghostidp)-->Ory OAuth2 and OpenID Connect: Transmits consent result and receives redirect url with consent verifier
    Consent Endpoint (ghostidp)->>Ory OAuth2 and OpenID Connect: Redirects to redirect url with consent verifier
    Ory OAuth2 and OpenID Connect-->>Ory OAuth2 and OpenID Connect: Verifies grant
    Ory OAuth2 and OpenID Connect->>OAuth2 client: Transmits authorization code/token
Getting started
The easiest and recommended way to run ghostidp is to use Docker or Kubernetes.
Docker
In this guide, we will deploy Ory Hydra and ghostidp with Docker.
Hydra Configuration
Start by creating the configuration file for Hydra:
# config/hydra/hydra.yaml
serve:
  cookies:
    same_site_mode: Lax

urls:
  self:
    issuer: http://127.0.0.1:4444
  consent: http://127.0.0.1:8080/consent # ghostidp Login Endpoint
  login: http://127.0.0.1:8080/login     # ghostidp Consent Endpoint

secrets:
  system:
    - youReallyNeedToChangeThis

oidc:
  subject_identifiers:
    supported_types:
      - pairwise
      - public
    pairwise:
      salt: youReallyNeedToChangeThis
GhostIdP Configuration
Create a config for ghostidp, containing the hard-coded users:
# config/users.yaml
users:
  - username: alice
    display:
      description: A demo user called Alice
    email: alice@example.com
    given_name: Alice
    family_name: Smith
    custom_claims:
      roles:
        - admin
        - user
      department: engineering
      employee_id: "12345"
  - username: bob
    display:
      description: A demo user called Bob
    email: bob@example.com
    given_name: Bob
    family_name: Johnson
    custom_claims:
      roles:
        - user
      department: marketing
      employee_id: "67890"
Running GhostIdP
Create a Docker Compose file:
# docker-compose.yaml
services:
  sqlite:
    image: busybox
    volumes:
      - hydra-sqlite:/mnt/sqlite
    command: "chmod -R 777 /mnt/sqlite"
  hydra:
    container_name: ghostidp_hydra
    image: oryd/hydra:v2.3.0
    ports:
      - "4444:4444" # Public port
    command: serve -c /etc/config/hydra/hydra.yml all --dev
    volumes:
      - hydra-sqlite:/mnt/sqlite:rw
      - type: bind
        source: ./config/hydra/
        target: /etc/config/hydra
    pull_policy: missing
    environment:
      - DSN=sqlite:///mnt/sqlite/db.sqlite?_fk=true&mode=rwc
    restart: unless-stopped
    depends_on:
      - hydra-migrate
      - sqlite
  hydra-migrate:
    image: oryd/hydra:v2.3.0
    environment:
      - DSN=sqlite:///mnt/sqlite/db.sqlite?_fk=true&mode=rwc
    command: migrate -c /etc/config/hydra/hydra.yml sql up -e --yes
    pull_policy: missing
    volumes:
      - hydra-sqlite:/mnt/sqlite:rw
      - type: bind
        source: ./config/hydra/
        target: /etc/config/hydra
    restart: on-failure
    depends_on:
      - sqlite
  ghostidp:
    container_name: ghostidp
    image: ghcr.io/guillaumebour/ghostidp:latest
    volumes:
      - ./config/users.yaml:/users.yaml
    environment:
      HYDRA_ADMIN_URL: http://ghostidp_hydra:4445/admin
      USERS_FILE: users.yaml
    ports:
      - "8080:8080"
    depends_on:
      - hydra
volumes:
  hydra-sqlite:
Start Hydra and ghostidp with docker compose up -d. After a few seconds, both Hydra and ghostidp should be ready.
Create an OAuth2 Client for your application, here to perform an Authorization Code Flow (see Hydra's Documentation for the full reference of Hydra's CLI).
docker exec ghostidp_hydra hydra create client \
  --name "Demo client" \
  --endpoint http://127.0.0.1:4445 \
  --grant-type authorization_code,refresh_token \
  --response-type code,id_token \
  --format json \
  --scope openid --scope offline \
  --redirect-uri http://127.0.0.1:5050/callback \
  --skip-consent \               # Whether you trust the client and want to skip the consent page
  --id "$YOUR_CLIENT_ID" \       # Omit to let Hydra create it for you
  --secret "$YOUR_CLIENT_SECRET" # Omit to let Hydra create it for you
Use the resulting client_id and client_secret in your application.
The URLs are:
- Auth URL: http://127.0.0.1:4444/oauth2/auth.
- Token URL: http://127.0.0.1:4444/oauth2/auth.
Kubernetes
warning
The Helm Chart is still work in progress.
In this guide, we will deploy Ory Hydra and ghostidp on a Kubernetes cluster.
This assumes you already have a cluster up and running, such as a Kind cluster.
Note that we here deploy Hydra and ghostidp together, with Hydra being a dependency of ghostidp. If you need more freedom/configuration options when deploying ghostidp (e.g. if you deploy it to EKS or GKE), you might want to deploy Hydra and ghostidp separately.
Deploying the chart
Start by creating a value file:
# values.yaml
ghostidp:
  usersConfig: |
    users:
      - username: alice
        display:
          description: A demo user.
        email: alice@example.com
        given_name: Alice
        family_name: Smith
        custom_claims:
          department: engineering
          employed_id: 12345
          roles:
            - admin
            - user
      - username: bob
        display:
          description: A demo user.
        email: bob@example.com
        given_name: Bob
        family_name: Marvel
        custom_claims:
          department: engineering
          employed_id: 6587
          roles:
            - user

hydra:
  serve:
    cookies:
      same_site_mode: Lax
  hydra:
    dev: true # Required to use Hydra without https
    config:
      dsn: "memory"
      urls:
        self:
          public: "http://127.0.0.1:4444"
          issuer: "http://127.0.0.1:4444"
        login: "http://127.0.0.1:8080/login"
        consent: "http://127.0.0.1:8080/consent"
Install the Helm Chart to the cluster:
helm install -f values.yaml ghostidp ./helm/ghostidp
Check that everything is running, it should look similar to:
NAME                    TYPE        CLUSTER-IP      EXTERNAL-IP   PORT(S)    AGE
ghostidp                ClusterIP   10.96.25.18     <none>        8080/TCP   2m7s
ghostidp-hydra-admin    ClusterIP   10.96.187.133   <none>        4445/TCP   2m7s
ghostidp-hydra-public   ClusterIP   10.96.173.142   <none>        4444/TCP   2m7s
kubernetes              ClusterIP   10.96.0.1       <none>        443/TCP    16m
Create the client
kubectl get pods -l app.kubernetes.io/name=hydra -o name | xargs -I{} kubectl exec {} -- \
  hydra create client \
  --name "Demo Client" \
  --endpoint http://127.0.0.1:4445 \
  --grant-type authorization_code,refresh_token \
  --response-type code,id_token \
  --format json \
  --scope openid --scope offline \
  --redirect-uri http://127.0.0.1:5555/callback
Access the Identity Provider
Forward the Hydra's public service and the ghostidp one:
kubectl port-forward service/ghostidp-hydra-public 4444:4444
and
kubectl port-forward service/ghostidp 8080:8080
As in the Docker Example, the URLs are:
- Auth URL: http://127.0.0.1:4444/oauth2/auth.
- Token URL: http://127.0.0.1:4444/oauth2/auth.
Managing Users
Users configuration
Available users can be configured in the users.yaml config file provided to ghostidp:
# This is an example config
users:
  - username: jeandupont
    display:
      description: A demo user called Alice
    email: jean.dupont@example.com
    given_name: Jean
    family_name: Dupont
    custom_claims:
      roles:
        - admin
        - user
      department: engineering
      employee_id: "12345"
Where the fiels are used as follows:
username: used in claimsdisplay.description: only used in the UIemail: used in claimsgiven_name: used in claimsfamily_name: used in claimscustom_claims: used in claims
As the name indicates, custom_claims can be used to provide custom claims per users to fit your application needs.
The standard claims are created as follows:
sub: mapped tousernameemail: mapped toemailgiven_name: mapped togiven_namefamily_name: mapped tofamily_namename:[given_name] [family_name]
The custom claims are then added to the standard claims. The claims resulting from the above example are thus:
sub:jeandupontemail:jean.dupont@example.comgiven_name:Jeanfamily_name:Dupontname:Jean Dupontroles:["admin", "user"]department:engineeringemployee_id:12345
As the name indicates, custom_claims can be used to provide custom claims per users to fit your application needs.
Customisation
ghostidp's UI can be customized to better fit your needs.
This page describes the available environment variables that can be customized.
System
Log level
Set DEBUG to true if you want ghostidp's logs to be more granular.
Login and consent pages
Adding a badge
You can add a badge with an arbitrary text in the header of the login and consent pages. While this badge is intended to help distinguish between environment, how you use it is up to you.
To add a badge, set the BADGE environment variable to e.g. DEV ENV.
To set the color of the badge, refer to the Accent color section below.
Accent color
You can set the accent color by setting the ACCENT_COLOR environment variable to a hex color code, e.g. #008F8C.
Version
You can add version information in the footer of the login and consent pages by setting the VERSION environment variable to e.g. v1.0.0-beta.
While the intended use is to display version information, how you use it is up to you.
Header Text
You can customize the text used in the header of the login and consent pages by setting the HEADER_TEXT environment variable.
Header Logo
You can customize the logo used in the header of the login and consent pages by setting the HEADER_LOGO_URL environment variable.
Users
Description
Users' description text can be set when configuring the users, by setting the display.description field:
users:
  - username: alice
    display:
      description: A demo user called Alice
Avatar text
The text in the Avatar can be set when configuring the users, by setting the display.avatar_text field:
users:
  - username: alice
    display:
      avatar_text: AS
Avatar color
The color of the Avatar can be set when configuring the users, by setting the display.avatar_color field:
users:
  - username: alice
    display:
      avatar_color: "#03a1fc"